
Ceramic 3D Print

Concept Sketch:
Trying to combine our (Adam, Siwon, and Erica's) original object and our new group members (Amanda and Ri's) design, was quite confusing at first. We realized that Amanda and Ri's design doesn't work with the ceramic 3-D print as the base of the design, along with how their design all meet together at a very sharp point. With our design, the rings hanging off the design wouldn't work with the clay either. We all liked the way Adam and Siwon's design faded together really well, so each of us sketched out one design where it blended both objects together in different ways. We ended up having similar ideas of adding the egg-shaped at the bottom and keeping the fade between Adam and Siwon's design.
          

Rhino 6 files:
Merging similar parts of sketches, we decided to create it in Rhino to visually see if our post In some of the screenshots, in the background are the trial and errors of the design. We had to rebuild our initial designs as separate parts before putting them together as one big design. Initially, we place together Siwon's diamond-cut design, and Amanda and Ri's egg design together. We decided to try and include the rings from our original design to give it more structure after our first attempt. Thinking logically, we had to include the rings in a way that would hold up with a ceramic printer, so we decided to cut the rings in half and stack them together. 


Slic3r file:
We decided to cut a bit of the bottom from the lower layer of the ring, and stretch the design vertically by 125% so that the rings would stack nicely and won't collapse during the 3D print. We had to go back into MeshMixer to smooth our parts of the rings. This is the final digital design before we print.
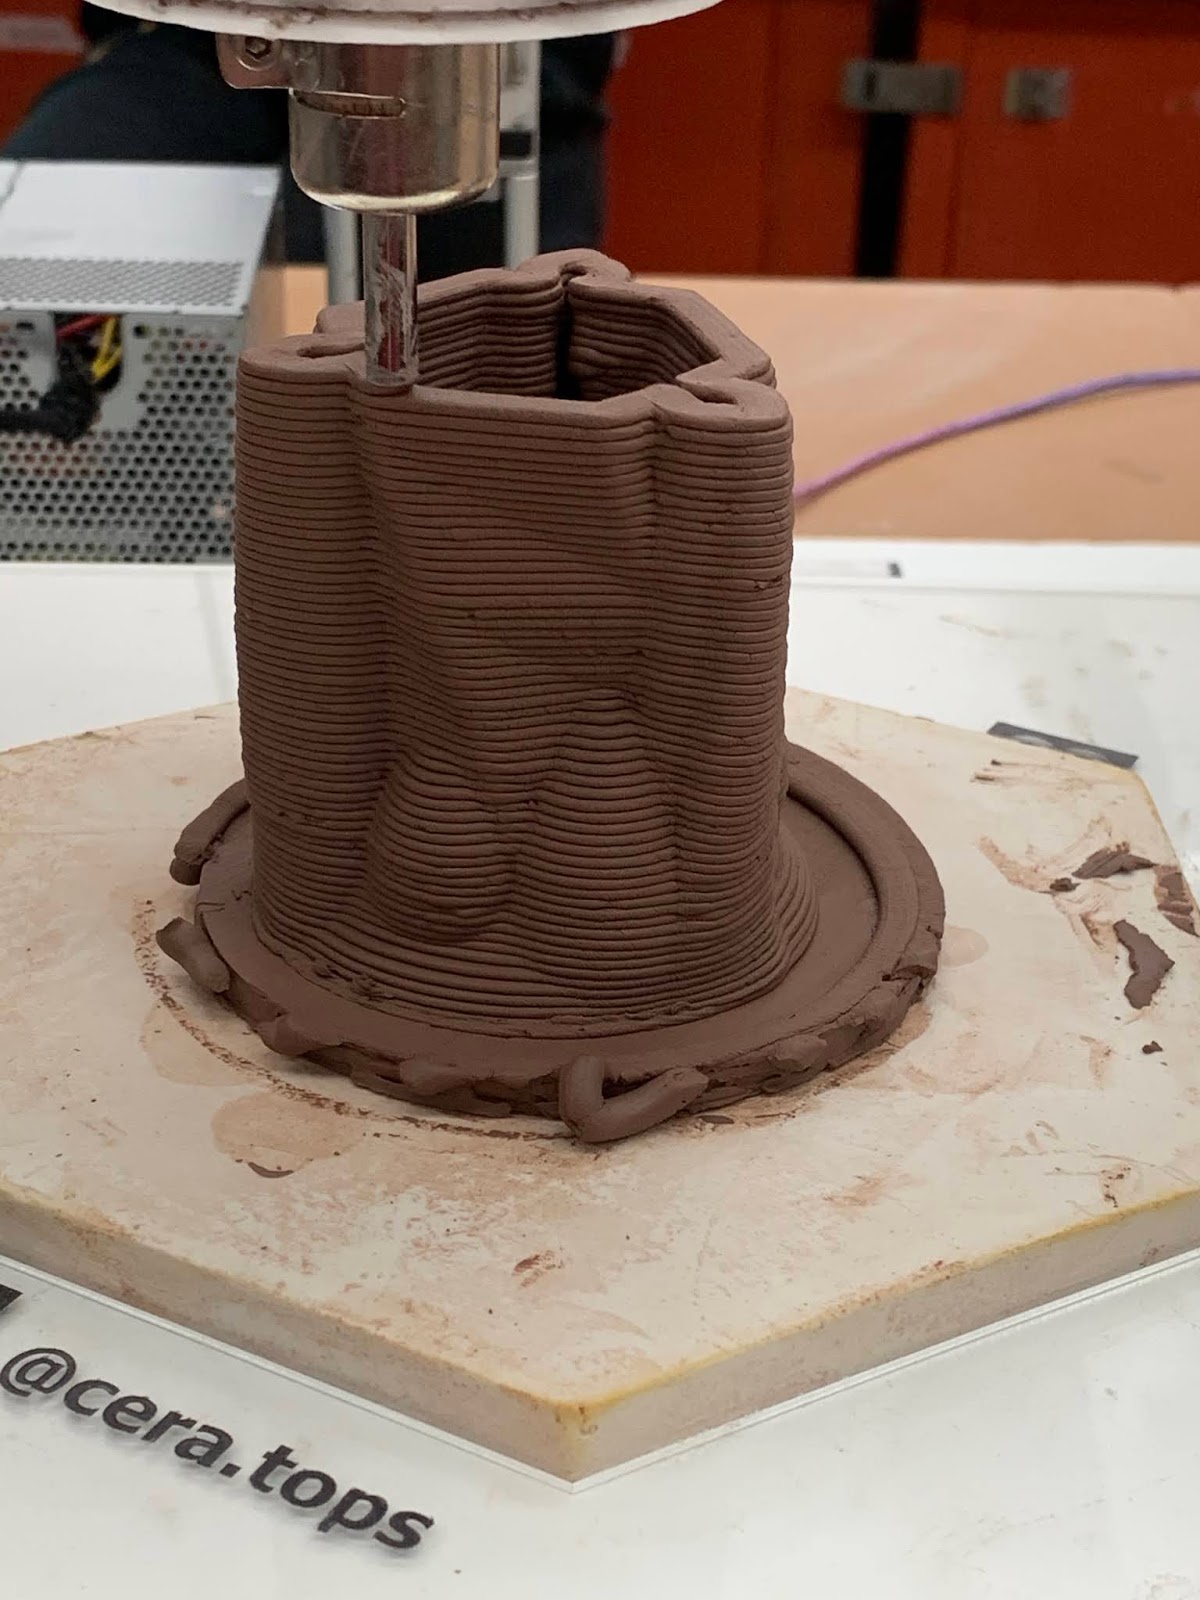
Ceramic Print:
This is how our object came out. The first version of our print didn't fully work, it ended up "crashing" mid-print so we had to restart. Throughout the printing process, the clay kept caving in near the bottom where the egg-shaped parts were so we had to add a fan to harden the print without it collapsing. Near the end, the print started printing the object really oddly, because it printed Siwon's diamond cut base then connecting Adam's piece separately. But in the end, the print turned out pretty well the diamond-cut parts really showed up in the end, more than I expected. Can't wait to see the ceramic print after it's glazed and fired!


Comments

Popular posts from this blog

4. Parametric Structure Scale Model (Digital) (ii)

Title: Lap Wave Desk Inspiration: Ocean/Wave glass sculptures and The Great Wave off Kanagawa print by Hokusai Difference from typical furniture: A typical lap desk is formal looking, just metal and a plain one colour platform. I wanted something that's less traditional and more sculpture base, one that looks like an art piece and might benefit some users with the wave patterns as holders.  Function: It's a lap desk! Those computer desks are portable and you can put them on your lap to hold your laptop on. Others might use it as a standing desk by putting it on top of a regular table Intended Location: Homes and maybe a less traditional office Intended Audience: Students, office workers, people who need to do work standing or work portable Here are the renders for my lap desk, I made two versions of it. One in an Oak material, one in transparent plastic with a slight blue colour just to make sure it would appear in the render. I made the decision of the transparent one bec...

Papercraft Research

What is papercraft?      Papercraft, to my understanding, is a paper-made art and craft. Paper is the easy-to-find medium so it is easy for people to use paper to make things with, in our case we would be making 3d objects and understanding how folds, crease, and tabs should be connected in order to hold pieces of paper in place. Reviewing an article: Popupology      The Popupology shop papercraft caught my eyes first. On the Colossal article, scrolling through that article, everything seemed very busy and complex, which I totally love, but it's not really my style. The Popupology shop ones, on the other hand, seemed so simple but so cool that it caught my eyes. Especially the hand-cut out one, how that is just a simple cut-out flipped on the other side and having it pop out with the thumbs looking like it's intersecting, that really stood out to me. Because this reminded me of elementary and how we used to do these DIY pop-up cards for holidays, t...

Memorial Jewellery Documentation II

Here's part two of my memorial jewellery piece, the final renders and explanations for my decisions on this project.  The functionality of the ear cuff is still iffy to me. I tried to create a hinge for the bottom curve so that it would make sense as a piece that uses the earring hole, instead of just being a metal that hangs on the ear. But overall I feel like it is still lacking in that portion of the design because it doesn't fully make sense. I would assume that you'd have to wear the bottom part through the earring hole before clipping the back end together and hooking it over the top of the ear. And because I created it as a hinge-based opening, I had to pair it with a snap post closure instead of the screw back I had initially chosen.  Theoretically, this ear cuff curvature would have to be adjusted from person to person because it's more personalized to fit an individual's ear shape. Plus it's designed to be aligned to the outer earlobe piercing so it wo...