Concept Generator:
These were the outcomes of what I had for generating concept, some of mine wouldn't fully work when I really thought of how the 3D printer worked. Only the flat coned shape and 3 rings fully worked, and it matched with my groups' the most since their shapes were mainly in a cylinder-like.


Combining Group Objects:
I was in a group with Adam and Siwon. Out of our three designs, Adam's had the more sturdy base design so the 3D Printer could hold everything together. Siwon's design was a more decorative angled vase shape, like diamond-cut edges. My design, placing it into Slic3r separately, I could tell the rings immediately didn't look as sturdy as we wanted. So mine has the most changes or reconsideration in how that would end up printing. We had to make sure the rings interlock with the base and each other so that the printer would keep everything into one piece without falling apart mid-print.

Initially, we had Siwon's in the center of the design, Adam's design surrounding hers, then the rings of my design to pull everything together, though we all agreed that it wasn't the best design we could make (the right object in the second photo under this subsection). So we started from scratch and really interlocked all three of our designs. With Adam and Siwon's design "fading" into each other, as it goes upwards, then including the rings from my initial design that goes into and exits the design. So that the rings are connected in a way that still shows the actual presence of the rings.

Adam's Original Design:
Siwon's Original Design:
Erica's Original Design:
Combined Rendered Design:
Printing:
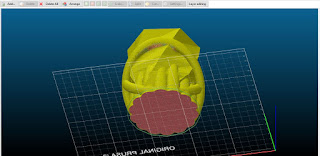
In Slic3r, we had to repeatedly go back and forth between Rhino, Mesh mixer, and Slic3r because we found areas of our object that lacked a bit of the "bottom base". Like for the rings, the bottom curvature of the hanging bits are too far and disconnected compared to the base of the design, along with a bottom layer that connects Siwon and Adam's design that slightly had a right-angled area.
We decided to remove the top area of the object and keep the bottom so that it looks like a vase/cup type of object. Looking inside our design, we ended up liking the way the curves of the rings, the cylinder bases of Adam's design, and the diamond cut design of Siwon's design are shown inside the object which looked interesting to us.


Comments
Post a Comment